


Let Me Show You the Ease of using an FSA with this guide. But first thing’s first: You will need to have already signed up for an FSA with your employer during your benefits enrollment period. If you missed it, I’m sorry, but you’ll have to wait until your next enrollment period. Hopefully this site will have convinced you on the merits of using an FSA to save money. I sincerely hope you remember to sign up the next opportunity that you do, and please come back to this site for tips!
I’ve grouped together a few topics that you’ll certainly encounter with an FSA. Click on a topic below to jump to the tips, or read ’em all the way through (great bedtime reading!):
Estimating How Much to Contribute
Deciding how much of your salary to set aside for your FSA can be a bit of a head-scratcher for newbies. If you set aside too little, you might blow through your account with qualified medical expenses before your year is over. At that point, you might kick yourself for not setting your contribution higher (thus saving more). But, if you set aside too much and don’t end up using it all by the deadline each year, you could lose what funds you have left and be kicking yourself even harder for leaving money on the table. (I say could because there are many ways to help you avoid this tragedy.)
I bet there are folks who pass on signing up for an FSA when they get overwhelmed with having to estimate a contribution. Forget it, they think, it’s not worth it. But don’t let this happen to you. Don’t let obstacles or laziness prevent you from saving real, substantial amounts of your hard-earned money. First of all, you will probably never estimate a perfect amount. Repeat that to yourself. And you know what? You won’t need to, because under or over-estimating ain’t all that bad. If you under-estimate, you should first tell yourself you did a good job for even saving any money at all. In addition, you’ll have a better idea of how much more to bump up your contribution next year (Maximizing your FSA savings is a multi-year journey!). And, if you find yourself running out of time to burn the rest of your balance, it’s possible (if allowed by your employer) that you’ll be able to roll-over up to $500 of your unused balance to the next year! (This was allowed only starting in 2013, so now there’s even less “risk” in losing unused FSA funds.) So then in the following year, you can contribute less, knowing you have a rollover amount from the previous year. Plus, this site aims to help you discover great, practical items/services that you may have never known are FSA-qualified. Together, we WILL figure out how to use every penny from your FSA account for maximum savings!
So, how should you begin to estimate your contribution? First, I would begin by finding out the answer to the following TWO questions from your employer or enrollment package info:
- Does your employer/FSA account allow any unused balance to rollover to the following year? How much? Although the government has done away with the “use-it-or-lose-it” rule and by allowing rollovers, it is still up to your employer to make it available to you in your account. So, find out if your employer was nice enough to do that.
- Or, does your employer/FSA account allow a grace period beyond the usage deadline? Alternately, the government allows implementing a grace period (typically 2.5 months) that extends your FSA usage deadline. But again, it is also up to your employer to offer that grace to you. Your employer can’t offer both rollovers and a grace period; So find out if which one they offer, or neither (if they’re kinda mean).
Once you know if you have rollover or grace period (or neither), you can better estimate how much you’d want to contribute. While there are tons of information on the Net on how to estimate (for example, calculators such as this one from Wage Works), at the end of the day, you can either pour a lot of time figuring out a tight estimate, or just take an educated stab at it. So if you’re the type to estimate/itemize every doctor’s visit co-pay, every dental deductible, and every potential expense item big or small, go ahead and do your homework. Or if you’re more like me, you’d like to get a rough estimate without spending a lot of time making an Excel spreadsheet. Here’s my quick-and-dirty formula I use for figuring out my contribution each year:
- I start by asking if there are any large, unusual items or services I think my family may use next year. Considering LASIK? Your kid needs to get braces? Finally getting that pricey dental work done this year? Anticipating any fertility treatments such as IVF? Open to trying a few sessions of holistic acupuncture that your co-worker has been raving about?
- Then, I make a short list of recurring stuff I know I’ll purchase throughout the year: Disposable contacts, contact solution, sunscreen, regular prescription medications, and co-pays for dentist and doctors visits.
- Combine #1 and #2, then add $250 more for unplanned expenses and misc medical purchases. If your employer allows a rollover to the following year, I would even increase the amount from $250 to up to $500. Why? If you really can’t finish draining your balance in a year (and this site will show you PLENTY of items you probably haven’t thought of), you’ll just rollover amount allowed by your employer to the following year. Just remember to dial down the following year’s contribution a bit.
There isn’t a perfect formula for estimating your contribution, but this is a start. As you continue to take advantage of your FSA year-in and year-out, you should be able to better at guess-timating your amount to contribute. Then you’ll truly be maximizing your FSA.
Buying Stuff (With Your FSA Benefit Card)
So now that you’re armed with a fully-stocked FSA account, you’re ready to take on the challenge of using it up! Who doesn’t like having to spend money? Remember, you can only use your FSA account on qualified medical expenses that are approved by the IRS. You can either check your purchases by flipping through a huge reference document like this one from an FSA administrator, or you can check out my page of expense ideas that will help you maximize your savings.
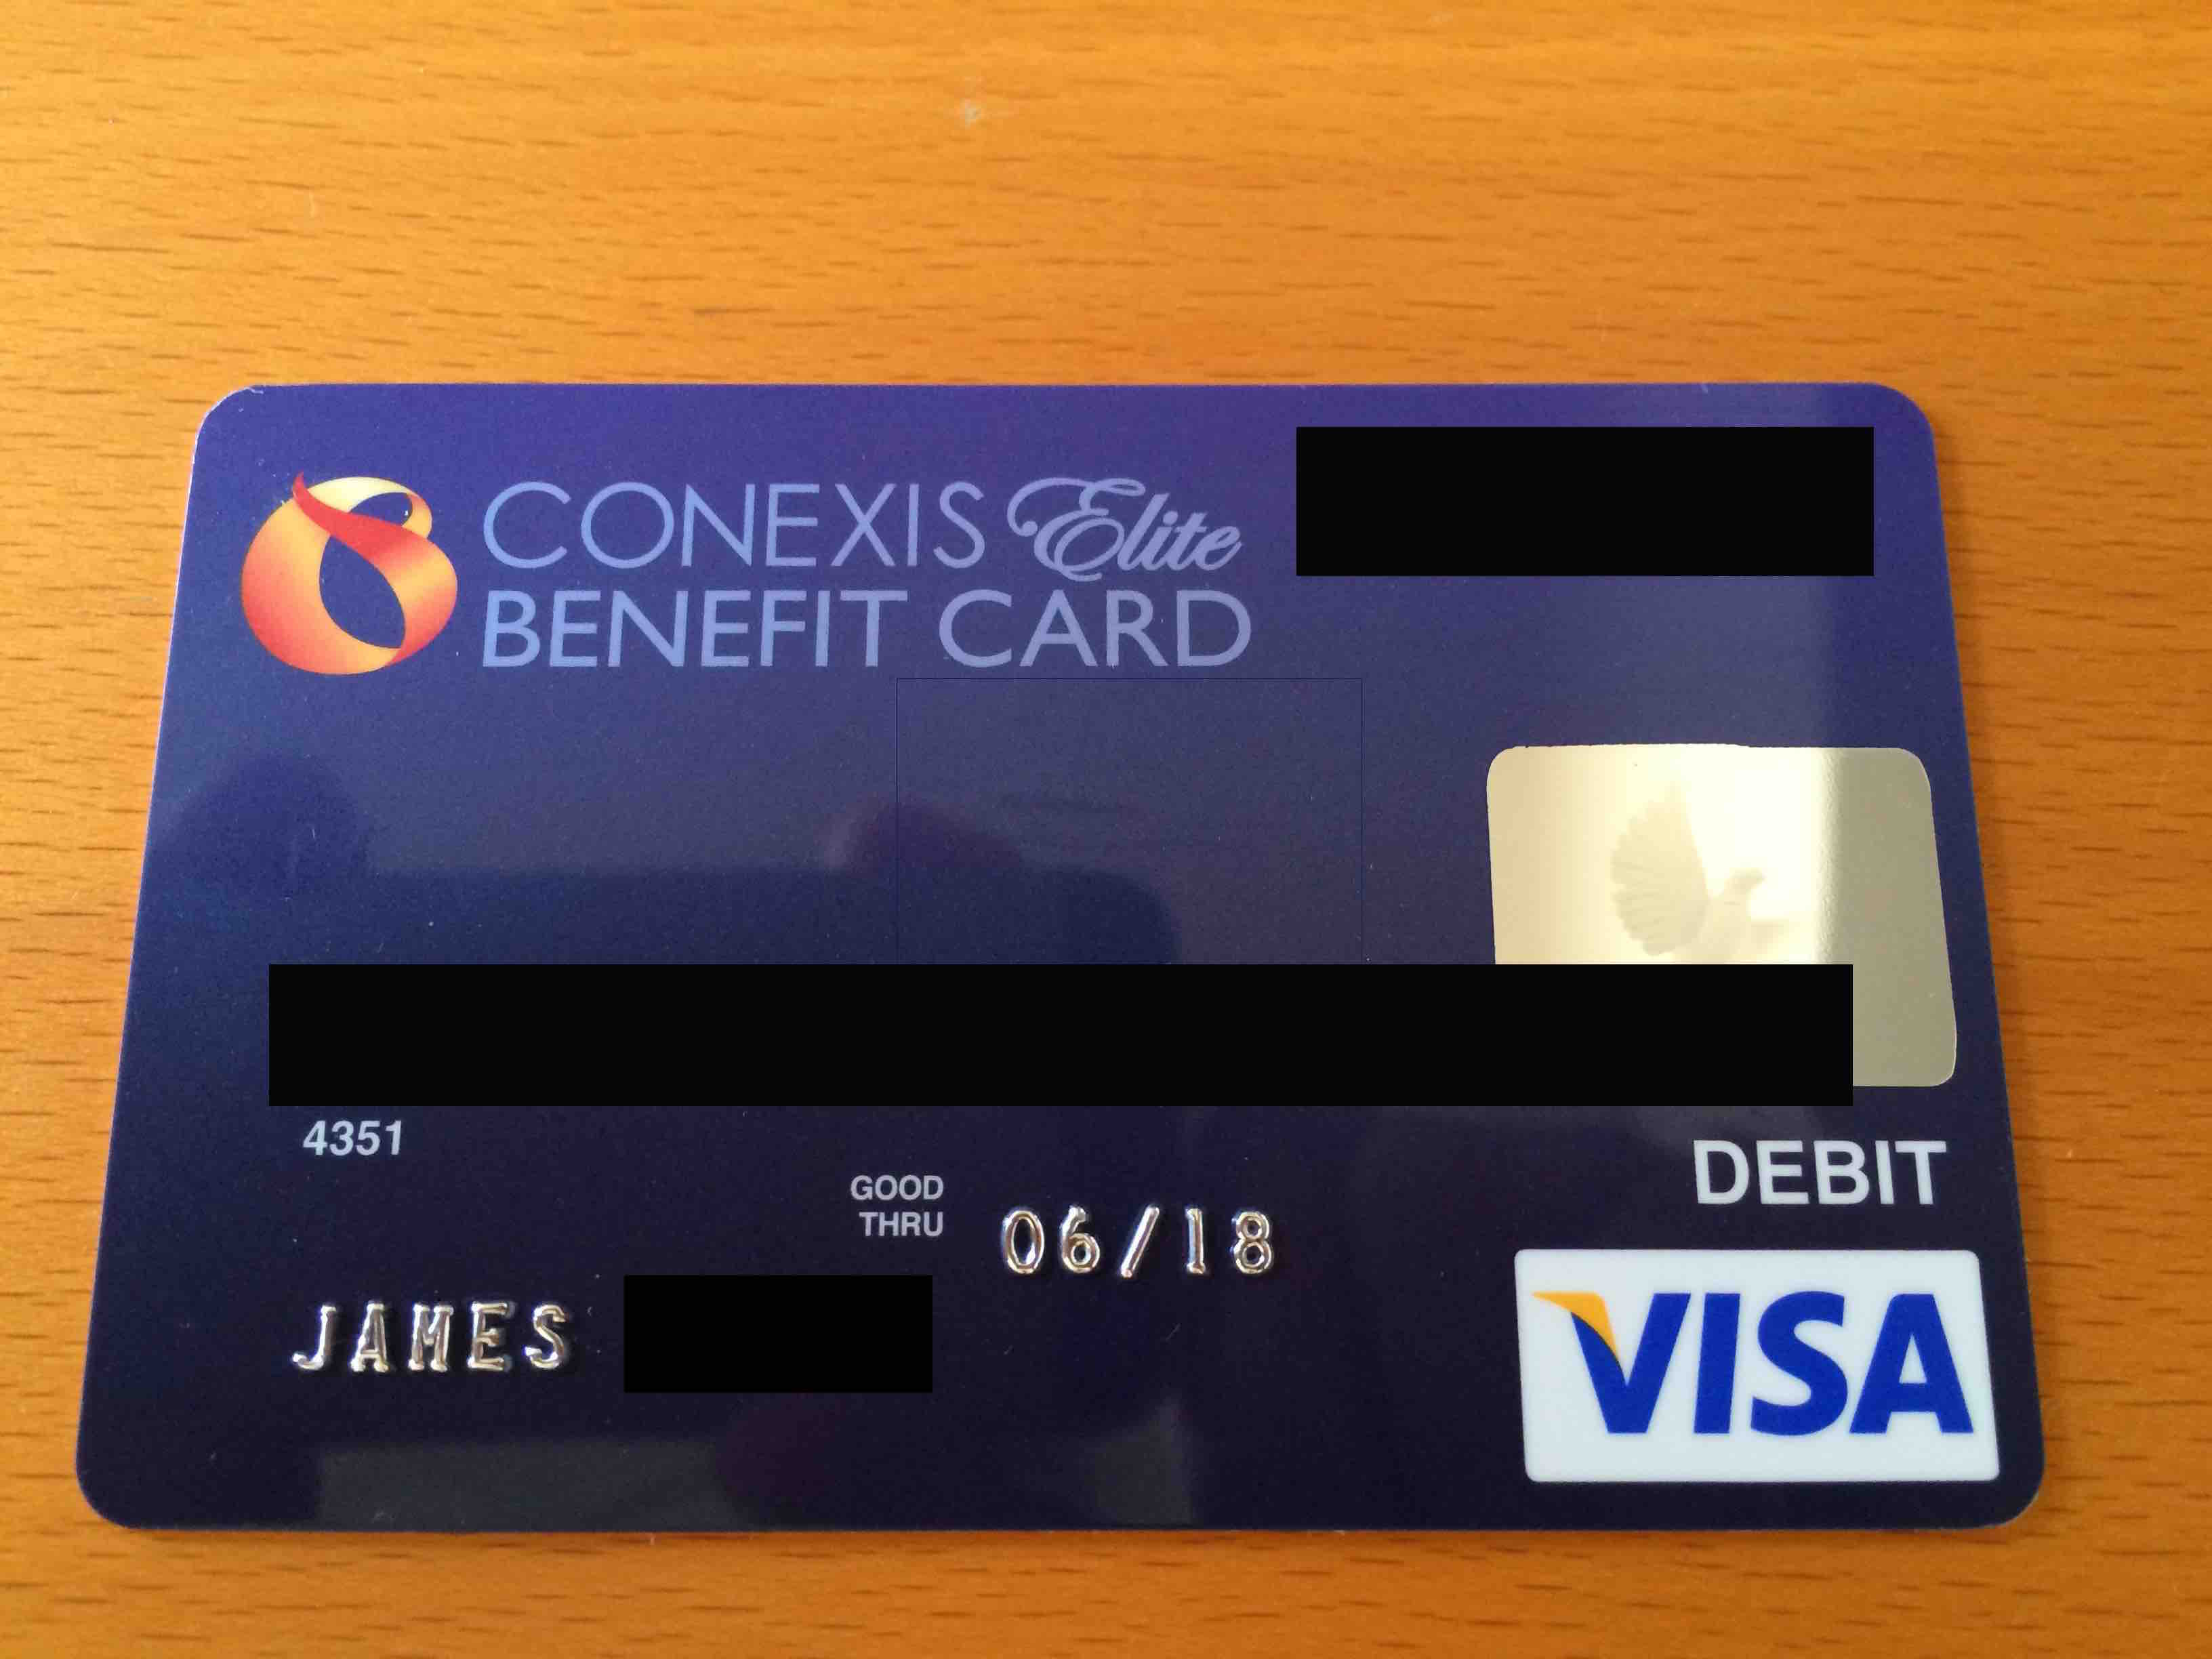
When you do have an item you want to buy, you can use your FSA account to purchase it generally in two ways: With your FSA benefit card or out-of-pocket (your own money up-front). An FSA benefit card is essentially a special debit or credit card (mine is marked as a VISA card) that gives you direct access to your FSA account. When you use it, purchases are paid-for directly from your account. Stop and think for a second: Your FSA account is funded by your salary, tax-free, of course. Then you use your account card to buy stuff. If the stuff is already pre-approved as a qualified medical expense (more on this in a sec), then the purchase is done. No annoying reimbursement paperwork, nada. Trust me on this: You will want to use your card to pay for purchases as much as possible. I truly hope your FSA administrator offers you a card, because it makes reimbursements (hence life) much easier.
Now, I hope it’s obvious you can’t just take your benefit card and go willy-nilly, buying anything you want at the mall. In fact, you card may likely get rejected if you attempt to use it at a non-healthcare related merchant. The purpose of the card is to be used at pharmacies, grocery stores, doctor’s offices, and other healthcare-related establishments. In fact, there’s a standard called the Inventory Information Approval System (IIAS), which, if implemented by a merchant, can automatically identify FSA-eligible items you can purchase with your benefit card. And when you purchase the valid FSA items with your card, it automatically deducts the amount from your FSA balance, and no reimbursement paperwork or verification is needed. (As you’ll see later with reimbursements, it can be a royal pain.)
As an example, Target stores contain a pharmacy and sells healthcare items that are FSA-eligible (eye-contacts solution, for example). Since Target is an IIAS merchant, when you checkout, you can use your FSA-branded benefit card. Target’s system will automatically know that your contacts solution is FSA-eligible, and will allow your FSA card to pay for it. Plus, your FSA administrator will see that your purchase is approved at an IIAS merchant, and won’t be requiring you to show any receipts or documentation. Your Target receipt will even indicate what items were FSA-eligible and paid by your FSA. By the way, if you also had non FSA-eligible items on the same purchase (you grabbed the latest issue of US Weekly + chewing gum in the checkout line), you’ll just first pay the FSA-eligible items with your FSA card, then pay the remaining balance with your personal funds. Major pharmacies such as Target FSA Store, CVS, Rite Aid (in-store), Walmart, and Walgreens are IIAS merchants, so use your benefit cards there. It’s super-convenient and a time-saver!
When using your benefit card at the doctor’s office to cover a co-pay, your card would likely be accepted as payment, but IIAS doesn’t apply for medical services (just items). There’s more flexibility to use your card at medical establishments, but the onus will be on you to provide proper documentation (receipt and statement showing the description of service) to your FSA administrator. In my experience, they are strict about showing super-clear documentation of your qualified service. If you don’t, or the service doesn’t qualify as FSA-eligible, you’ll have to pay the amount BACK to your FSA account after a certain time, or your account gets deactivated (until you take care of the ineligible expense). Paying back your FSA account for ineligible purchases can be a headache, so it’s best to know what co-pays, deductibles, and medical procedures will be FSA-eligible.
Providing Documentation For Benefit Card Charges
If you have a charge on your FSA benefits card that wasn’t pre-approved in the system (most healthcare services, co-pays, and deductibles aren’t), your FSA administrator most likely will flag-down that purchase and notify you that you’ll need to provide documentation. And usually they’ll give you a limited time period to do it, so don’t let it sit, lest they deactivate your account (I’ve been guilty). In general, you must provide EITHER an Explanation of Benefits (EoB) from your insurance carrier, OR an itemized statement from your service provider that states:
- Provider name and address
- Date of service
- Description of service
- Charge amount
Once you have that, you can now dutifully provide it to your FSA administrator online. Scan your document(s) to your computer, or if you’re lazy like me, just take a snapshot of it with your phone. It’s pretty simple; Here’s how I do it:
The examples I show will be with my employer’s FSA administrator, Conexis. Your employer will likely have a different company/administrator handle their FSA accounts for employees, but the mechanics should be similar. I’ll demo how to do it online, exclusively; I understand there are still ways of mailing-in documentation the old-fashioned way (c’mon really?), but you really must take advantage of the speed and convenience of providing docs online.
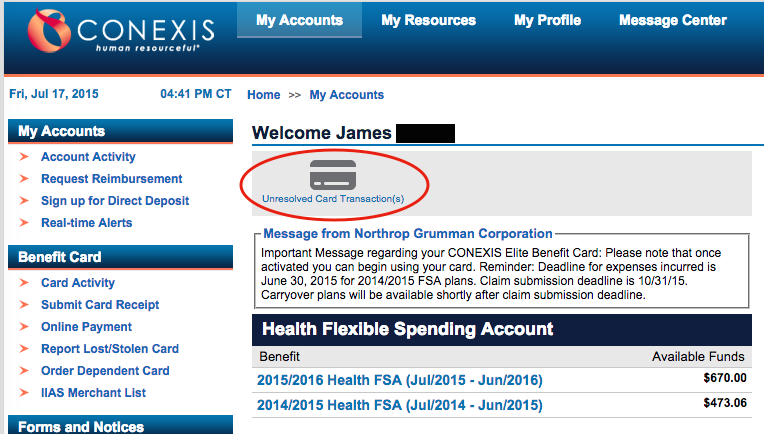
I’m logged into my FSA account site, and I see a notification: “Unresolved Card Transaction(s)”:
I click on that notice, which brings me to a description of a charge that wasn’t pre-approved at any IIAS merchant. In fact, my wife used our FSA card to pay for a $15 co-pay from a physical therapy session:
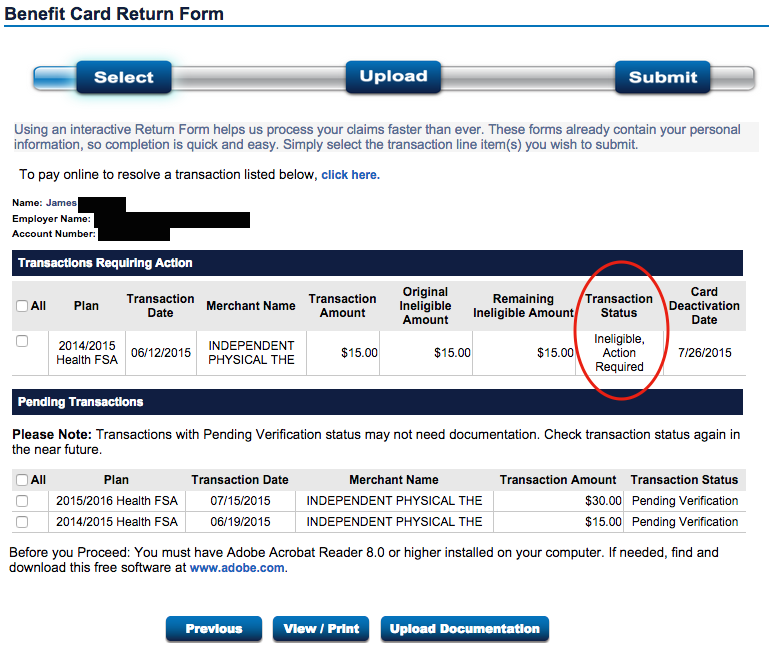
Notice the status of the charge says it’s “Ineligible”, and that “Action Required”. Well, a co-pay for a doctor’s visit is FSA-eligible, it’s just that I need to provide an itemized statement proving that this $15 charge was in fact for a qualified expense. Also, notice there’s a card deactivation date (yikes!). If I don’t take action by that date, my FSA card will get turned off. Anyway, moving on, I select this charge and click “Upload Documentation”, which brings me to this upload page: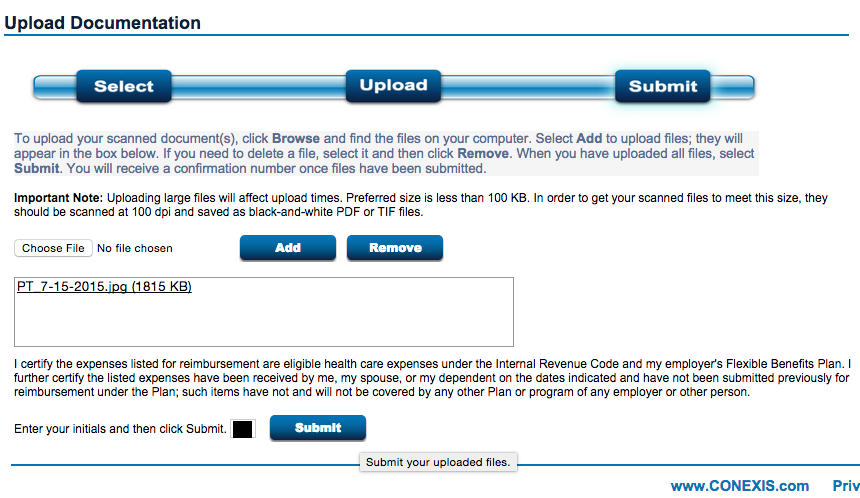 On this last page, I first click “Choose File” to select the file(s) off my computer. (Remember I used my iPhone to take a picture of my itemized statement I got from the physical therapist.) Then I click “Add” to actually upload that file to the website. After a few seconds it shows up in that white box, I sign-off my life by entering my initials, and hit “Submit”. That’s it, you’re done! Well, for now at least. Check back in a few days to ensure that your FSA administrator blessed your documentation. If they do, your charge status will be changed to “Approved by Documentation”. If they don’t, you’ll have to re-submit better documentation (perhaps your statement is missing something), or contact them to see why they rejected it. And if even that fails…
Paying Back Your FSA Account for Ineligible Charges
So what if you paid for a healthcare service or item with your FSA card, but found out later that it isn’t FSA-eligible? Or maybe you’re not able to obtain a clear statement, description of services, or EOB (Explanation of Benefits) detailing the service in a document? Your FSA administrator keeps rejecting your attempt. Unfortunately, you have to hang your head in shame and pay your FSA account back. It’s the equivalent of an embarrassing face-plant in the world of FSAs, but rest assured, I’ve experienced this too.
So, in order for me to pay back ineligible charges to my FSA account, I log into my FSA site and select “Online Payment”: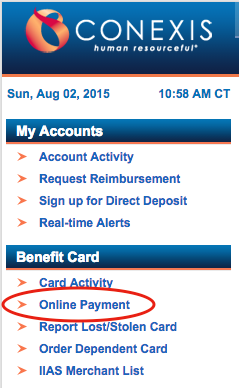
I’m then brought to a page for making one-time payments. Listed will be any charges that haven’t been resolved. Let’s say, for example’s sake, that I won’t be able to produce sufficient documentation for my charge of $30 below (I lost it, and my provider is a jerk and won’t print me another one). I click on the box to select the charge: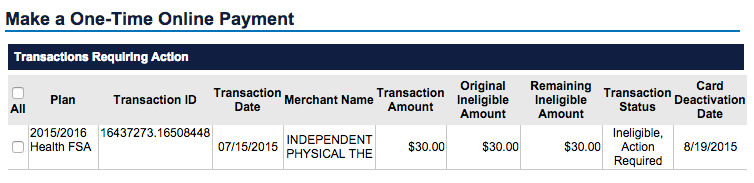
Once selected, I’m presented with a form on which I can enter my checking or savings account information. I fill in my next check number along with my account info, and click “Make Payment Now”: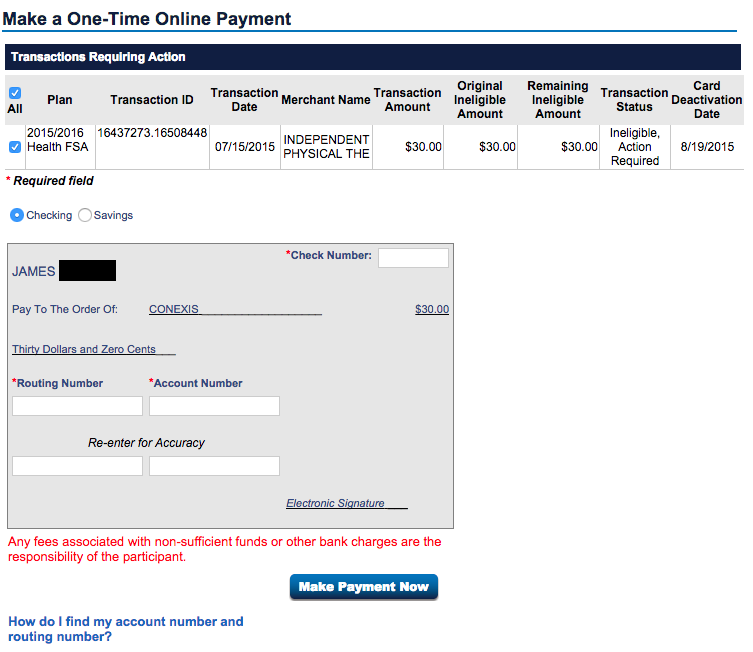
I’m essentially writing an electronic check to my FSA administrator (CONEXIS) to make up for the ineligible charge I made (be sure to void that physical check of the same number you just used in your checkbook). That’s it! At this point, all FSA sins have been forgiven, and I can move on with using my FSA account as before. As you can see, having to pay back an ineligible charge is a hassle. You’ll definitely want to avoid being in this situation with better knowledge of what is FSA-eligible, but sometimes it happens.
Buying Stuff (Out-of-pocket)
Sometimes you’ll be paying for FSA-eligible items and services up-front with your own money. Maybe your FSA administrator doesn’t offer a benefits debit-card (a shame!), maybe you left your FSA card at home, or maybe the pharmacy you bought that sunscreen from (FSA-approved) didn’t accept your benefits card for some unexplained reason. While it’s perfectly OK to pay out-of-pocket for costs that you know are FSA-eligible, it’s just more hassle to get reimbursed by submitting a claim. Sometimes a lot of hassle. If you love instant gratification, hate dealing with paperwork, and don’t like putting up your own dough up-front like me, you’ll most likely be annoyed with having to submit reimbursements. But I hate to say it, sometimes it’s the reality of using your FSA. It may not feel worth your time for a $6 pack of Disney bandaids, but it might be a little more necessary for your LASIK eye surgery. My advice: Just learn to make reimbursement-claims with your FSA administrator, large or small. Don’t be afraid of it. Make it a habit of saving your receipts (or taking pics of them), while making sure they’re very clear on what item or service it is. Make it second-nature to have your healthcare provider re-print that statement of service for you with a clearer description of service (Not just stating “co-pay”, but what that co-pay was for, for example.) While there are tips to soften the blow process-wise, at the end of the day, there will be SOME effort required of you when using an FSA. Don’t let that be a barrier for you. Save that money you’ve worked hard for. Get yours.
Getting Reimbursed For Out-of-Pocket Purchases
Here’s how I submit a reimbursement-claim on my FSA administrator’s (CONEXIS) site. Again, your exact steps might be different, but the general idea should be similar. First, I click on “Request Reimbursement” on the front page: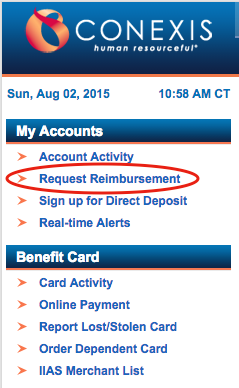 The page I’m brought to gives me a couple options. I choose “Reimbursement Request Form” and “Online” for submission method. However, this page informs us that we need to have a claim form created firstbefore continuing. (You’ll see later that we’ll need to return to this page to actually submit/upload documents.) So, I now need to click “click here” to create a new reimbursement form:
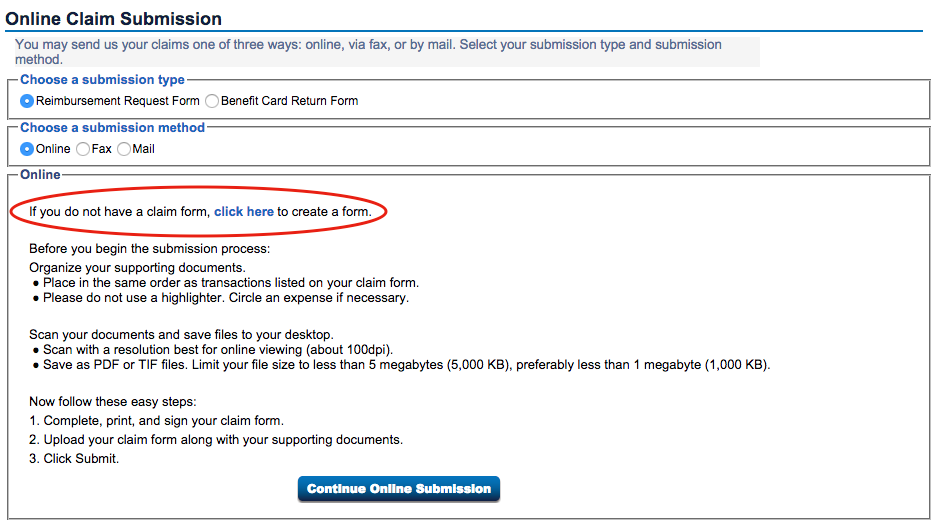
At the form-creation page, I’m given a few options on type of form to create. I choose an Interactive form since this option will fill in my personal information for me. (If I choose PDF Forms, I would have to download a template and fill in everything from scratch, including personal info.) Since I’ll take any option to fill out less lines, I click on “Health Care Account”, under Interactive Claim Forms and Request For Reimbursement: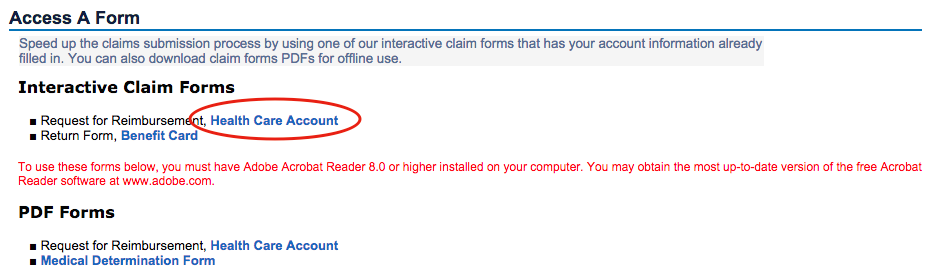
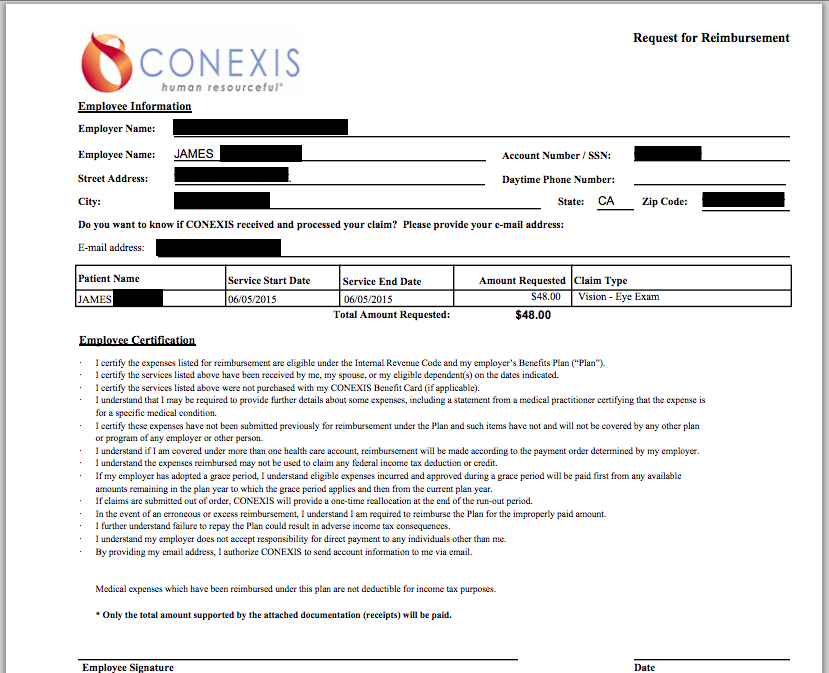
Now I’m sent to the interactive form page itself, where I can create reimbursement items line-by-line. For each entry, one enters the patient name (if it’s one of your dependents, you’ll be able to select that), claim type, amount, and service start and end dates. For my example, I’m requesting reimbursement for an eye exam I received in which I paid the co-pay with my own money. So I choose one of the pre-defined claim types, fittingly, “Vision – Eye Exam”. I just fill in the same start and end dates as the day I got this service. Then finally, I click “Add Item”: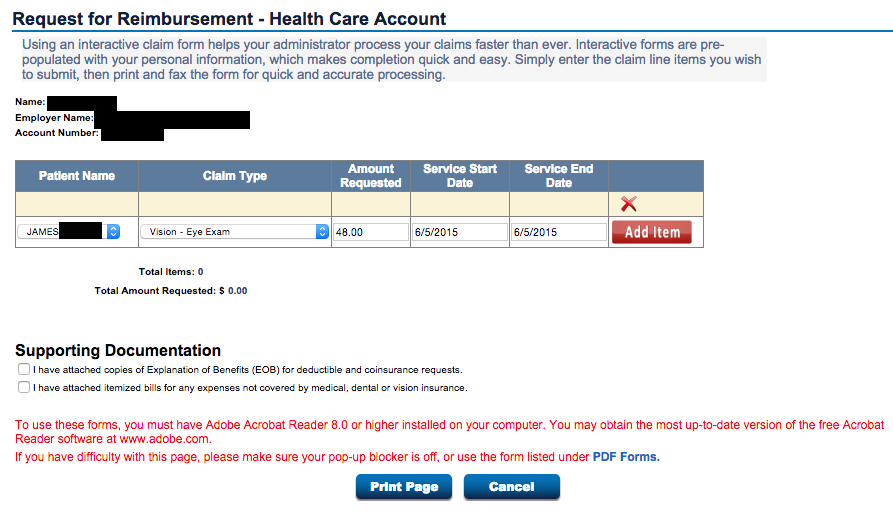 After an item is added, I can add more line items. But since I’m only requesting one item in this submission, I go ahead and click the box in the Supporting Documentation section, specifically the one that says I will be providing an itemized bill (which I have kept and taken a picture of from my optometrist). Now I’m ready to create this form. Notice the only button at the bottom of the form is to “Print Page”. But since I’m actually going to submit this form online, I just want to save my form electronically on my computer first, not physically print it. It would be nice if the site allowed me to just directly submit my form in electronic form, but it doesn’t seem to be completely seamless (in my opinion). Until they redesign their online-reimbursement flow someday (please, CONEXIS?), I have a few extra steps to do. So I click “Print Page”, but I’ll actually just be saving it as a PDF on my computer:
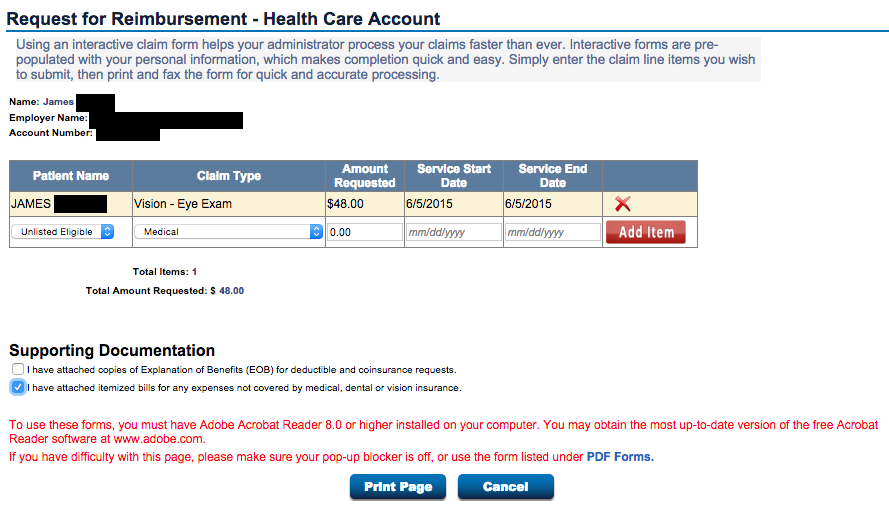
Next, the site gives me a preview of my reimbursement form, pre-populated with my personal info, as well as the reimbursement items I specified. There is a line for employee signature, but since I’m submitting everything electronically, I normally leave it blank. It hasn’t stopped me from getting my reimbursements from my FSA account. However, if your administrator tells you that you must sign it, you’ll have to physically print this form, sign, and scan it back electronically to upload back to them (whew). But let’s continue:
Now, in order to save this form to my computer, I select the “Print” option in my web browser as though I’m physically printing it to my printer. However, I’ll be choosing the option to “Save as PDF” to my computer, not the destination of a printer. When I save, I choose a location on I’m computer where I’ll remember how to get back to later: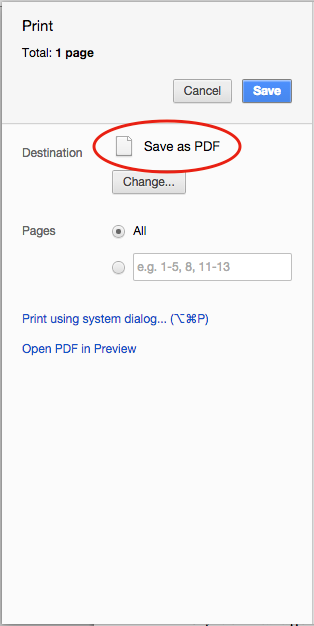
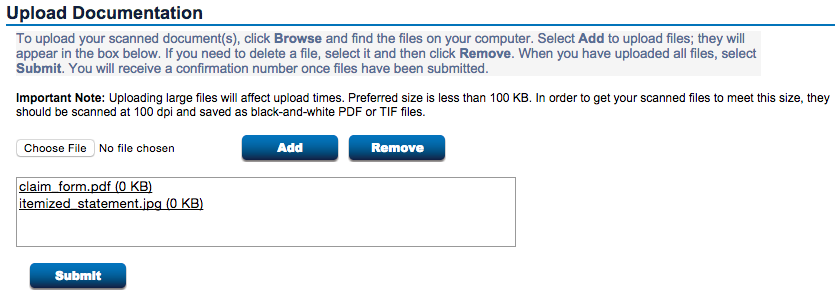
Now that I have my reimbursement form filled out and saved in electronic format (PDF) on my computer, I’m ready to actually upload the form along with my itemized statement, EoB, or other documentation. On my FSA account’s site, recall that I actually have to return to the front page, re-click on “Request Reimbursement”, and once again choose “Reimbursement Request Form” and “Online” for submission method. From then on, I can finally click “Continue Online Submission” to actually upload my documents. (This need to start over just to upload the documents is so non-intuitive and user-unfriendly, I wouldn’t be surprised if folks get really confused on how to submit their reimbursements. It’s almost like my FSA website’s submission process is designed to discourage people from getting reimbursed. Ok, I’m starting to digress, so let’s finish up our submission.) At the Upload Documentation page, I select and add my reimbursement form that I created and saved earlier. Also, I add my supporting documentation that clearly states that my service was for an eye exam, and that my balance was the difference that my insurance didn’t cover. That way, the administrator can ensure that my $48 co-pay is actually FSA-eligible. Finally, I click “Submit” to complete my reimbursement claim:
Hooray, I’m done! I just now wait to see that my submission is approved after a couple days. Overall, submitting a reimbursement isn’t all THAT bad, although the process can be a little confusing and inconvenient despite all of it taking place online. Sometimes, there could even be a little back-and-forth dialog with your FSA administrator if your documentation isn’t clear enough. However, you’ll quickly learn how to provide the essential info to make future reimbursements quick and painless. (Plus, I share all my stumbles on this site so you won’t have to learn the hard way.) At the end of the day, it really is worth the money you’re saving through your FSA!

